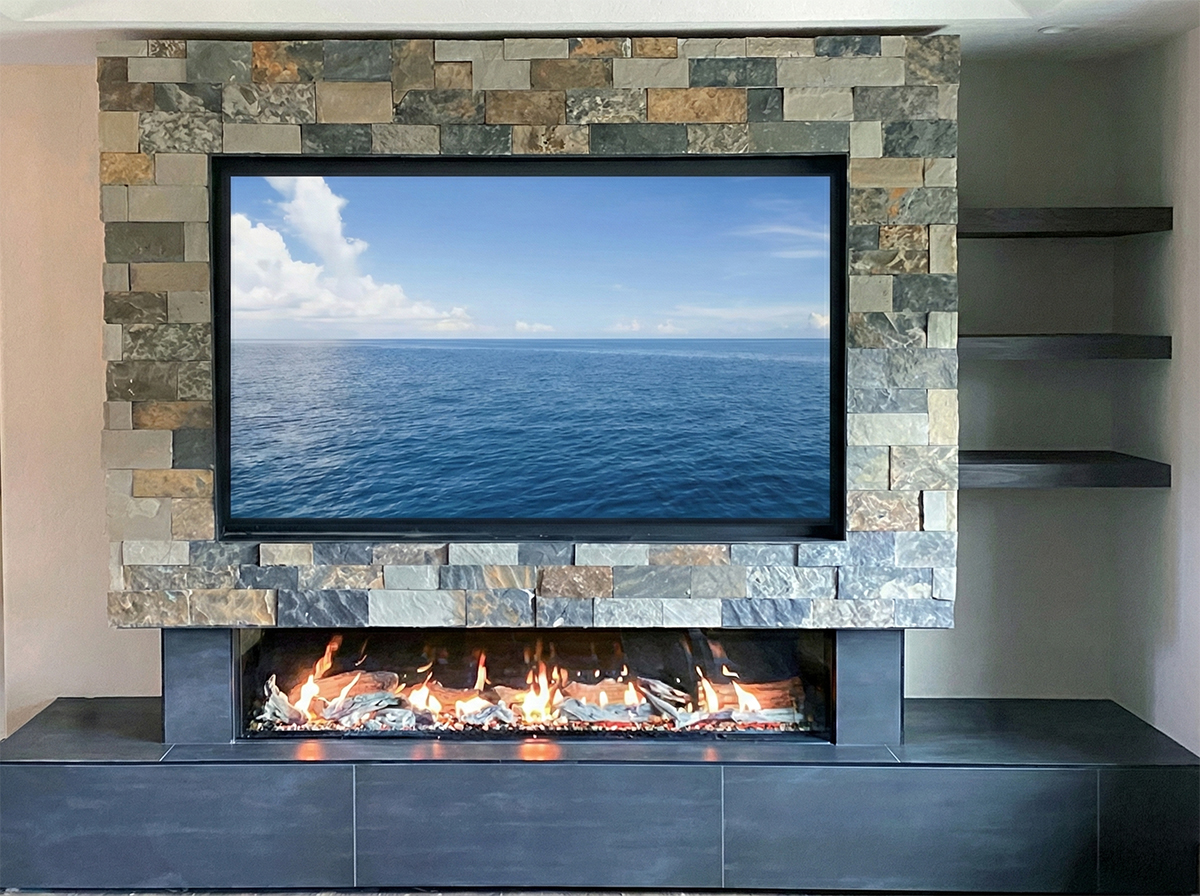
On a see-through fireplace the opening is a window as well as a firebox. You are not only looking at the flame, you are looking through it into the next room, so the height of the glass decides how much of that room you actually see.
A 16″ opening reads as a narrow letterbox: plenty of flame, very little sightline. Raising it to 24″ high opens the view considerably. The 30″ extra-high glass gives the largest uninterrupted opening between the two spaces of any Flare see-through model. The two rooms read as connected rather than divided by a wall with a slot in it, and the flame has the vertical room to be seen properly from both sides.
Most linear gas fireplaces offer a single narrow height. Flare builds see-through gas fireplaces in all three sizes, 16″ regular, 24″ high and 30″ extra-high, right across the 30 to 100 inch width range, so the opening can be sized to the wall and the view rather than the other way round.
Yes, Flare recommends following the media calculations guide to ensure we use the correct amount of media and do not overcrowd the burner of the fireplace. Once calculated, you can use the media placement guide to help arrange this media for optimal viewing performance and minimal soot.
Media Calculations Guide
Media Placement Guide
If you have questions regarding the quantities used or placement, please contact [email protected] with any details regarding your fireplace.
Fireplace Finishes & Media Options
It’s more than just a fireplace, it’s your fireplace.
What interior finishes and media options are available for Flare Fireplaces?
The default interior firebox finish is durable black metal, designed for a timeless, modern look. For an upgraded appearance, you can choose a black ceramic reflective glass back panel. This panel reflects the flames when the fireplace is on, creating more depth and brightness, while staying clean and dark when the unit is off. Because it’s made from ceramic glass, it is both heat-resistant and built to last.
Additionally, every Flare Fireplace comes standard with one classic decorative media option of your choice (such as logs, stones, or glass media). If you want to customize further, you can add additional classic or premium media options, with pricing based on the type and quantity you select.
👉 Learn more about our reflective ceramic glass back panels or browse our full fireplace media selections.
No. Flare Fireplaces is a manufacturer and wholesale supplier based in Texas. Our team does not have a physical presence, employees, or licensed technicians in other states. We are not licensed to perform gas connections, labor, or on-site inspections.
All installations and local service must be performed by your local authorized dealer or a third-party NFI-certified professional in accordance with your local building codes.
Please use our Store locator to find an independent, authorized retailer. These third-party businesses are the local experts who sell, install, and maintain our products in your community.
Yes, premium media, gas logs and decoration, ordered with or after the fireplace may result in additional shipping costs due to the following reasons:
-
Premium media can increase the overall weight or size of the fireplace packaging.
-
It is typically shipped on top of the fireplace unit, which increases pallet dimensions and may result in a higher shipping rate.
Flare Fireplaces offers free shipping on fireplaces within the U.S.
Any shipping costs related to premium media are typically minor in comparison to the full order.
A note about potential premium media shipping charges appears in the following locations:
-
The Price Book Terms
-
The Price Book Premium Media Table
- Flare Fireplaces Invoices
If you have any concerns, you’re welcome to contact the Flare ordering team ([email protected]) to confirm any additional shipping cost before finalizing your order.
See Flare media & Gas logs decoration page for information on our firebox decoration options.
Commercial & Residential Flare Fireplaces
The Flare Commercial System Overview:
- Double Glass, included by default in Commercial System.
- Honeywell commercial valve.
- Media
- Wider unit to cool the glass even more. (compared to residential) (FF and ST units only).
- Commercial fans for cooling between the glass.
- Support for ON/OFF simple wall switch.
- Analog or digital timer.
- Use phone application or remote control.
- CSA file # 263124 – ANSI Z21.88 – CSA 2.33
- Optional LED system.
- Optional Power Vent with a vent as small as 3×5″.
- Option of SK for summer operation with minimal heat.
The Flare Residential System Overview:
- Safety Screen, included by default.
- Maxitrol residential valve.
- Choice of Classic Media to fill Fireplace.
- Standard width unit for narrower application.
- Double Glass upgrade available to include blower fans for cooling between the glass.
- Support for ON/OFF simple wall switch.
- Analog or digital timer.
- Use phone application or remote control.
- CSA file # 263124 – ANSI Z21.88 – CSA 2.33
- Optional LED system.
- Optional Power Vent with a vent as small as 3×5″.
- Option of SK for summer operation with minimal heat.
The clearance to combustibles in front of the short side glass is the same as the front glass: 36 inches to combustibles.
No. Louvers must remain completely unobstructed at all times to ensure proper airflow and safe operation of the fireplace.
Blocking or covering the louvers restricts the movement of air, which can lead to excessive heat buildup inside the enclosure.
This may result in reduced performance, overheating of components, potential damage to the unit, and could void the warranty.
Always maintain clear space around louvers and avoid placing any materials, finishes, or objects over them.
Follow the video link for the installation guide on a Flare Fireplaces Double Glass passive fireplace.
See the Double Glass feature page for more information on what is the Flare Fireplaces double glass feature active and passive feature.
Yes, the leg extensions have minimums and maximums.
- Minimum – 4″ – Fireplace will arrive with legs set at lowest height, glass will be 10″ off the floor (11″ when using leveling feet)
- Maximum- 12″ – Fireplace with fully extended legs at max height, glass will be 18″ off the floor (19″ when using leveling feet)
Leg extensions provide additional 8″ of height (plus additional 1″ from leveling feet)
Telescopic Legs | Manual
If you or your customer desire a higher glass height, you can use the leg extensions in combination with a platform to raise the fireplace to the optimal viewing area.
Yes, Televisions (or any other electronics) or Artwork can be mounted as close as 12″ to the top of the glass of your Flare Fireplace.
See TV/ART Mounting Specification Manual below for details regarding the installation requirements/recommendations.
TV/ART Mounting | Specification Manual
Yes, every Flare Fireplace Front Facing/See Through/Passage can have it’s component’s accessed through the face. A link for both a video and the manual will be provided below.
Click For Accessing Components Through Fireplace (Front Facing, See Through, Passage) | Video
Click For Accessing Components Through Fireplace (Front Facing, See Through, Passage) | Manual
If you have any questions, please call the support line or reach out to [email protected] with any questions.
It is possible to add a Power Vent to a fireplace after the initial order. It is best to consult with your local Flare dealer team and Flare Fireplace representative ([email protected]) to detail the intricacies and specific components that may be involved in adding a Power Vent to your Flare Fireplace.
Adding A Power Vent After Fireplace Purchase
Duravent Install & Frame Cut-Out
Duravent is one of two venting manufacturers certified to work with Flare Fireplaces. The flue pipe should be 3×5, 4×6, or 5×8 diameter concentric pipe, B-Vent will not work. Below you will find the specific cut-out size for each component. Finally, use the chart to verify the cut-out dimensions for your job.
*Most importantly, if you have any questions contact Duravent for further assistance.
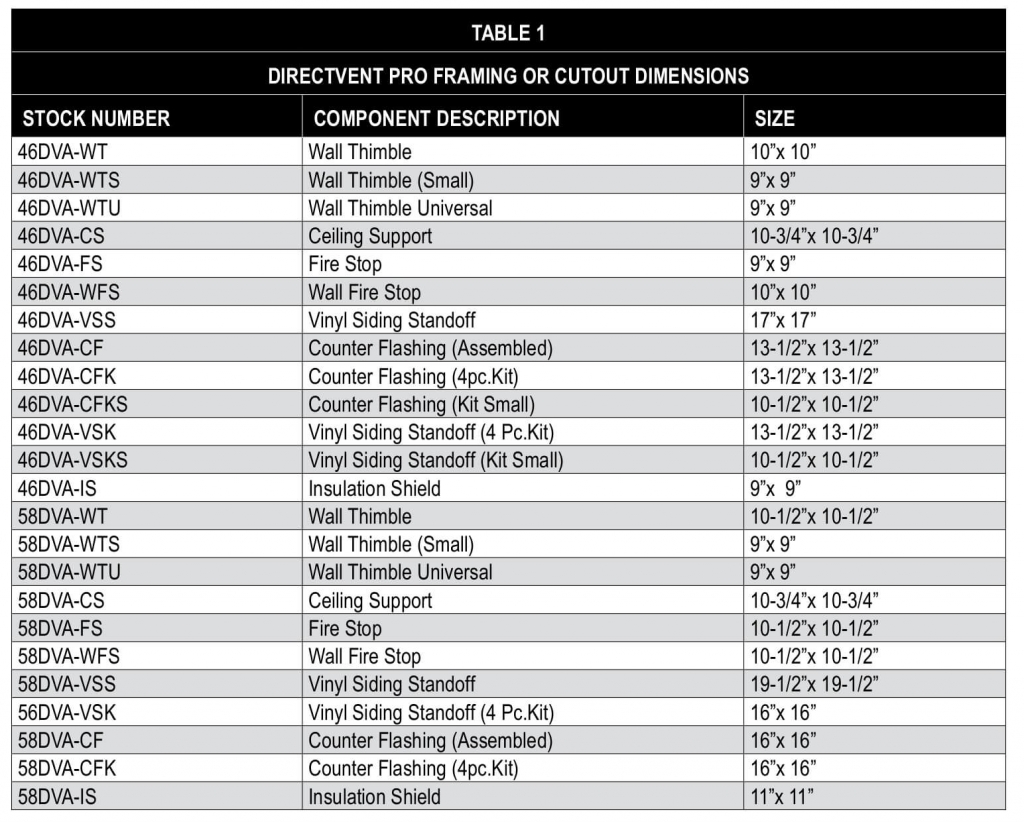
Because the table is taken from the Duravent Install Manual you’ll find more details at http://www.duravent.com.
All fireplace details (including Framing Guides for both wood & metal) can be found on the Direct Vent Download Center.
Direct Vent Download Center
The linear Fireplace side clearance (no glass side) is the same as the back of the fireplace:
- 1” to Non-Combustible.
- 2” to Combustible. Combustible cannot be exposed behind/side of the Fireplace.
If installed in an existing corner, two option to plan and install:
Option 1
- Cover existing corners, walls and wood studs or any other combustible metrical with Non-Combustible (Cement board or Type X fire rated, ~ 1/2 ” thick or).
- Install fireplace 2” from the Non-Combustible back.
- in case of a side wall next to the front glass, install Fireplace 4″ from the side.
Back: fireplace is 2” from back Non-Combustible & 2.5” from the covered Combustible existing material.
Side: Fireplace is 4″ from Non-Combustible and the fireplace glass is 7″ from the side wall. See chart below. Red line showing reflective heat from the glass.
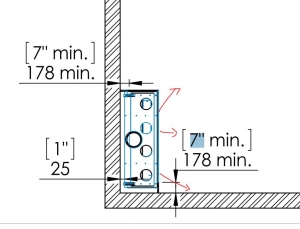
Best option for corner unit that are installed in an existing homes and a chase is built around it.
Option 2
- Construct the walls and studs on the back and side of the fireplace from Non-Combustible material. Metal studs and cement board.
- Clearance of 1” from Metal studs and Non-Combustible material.
- Any Combustible is covered with Non-Combustible and is 2” away.
- In case of a side wall, keep fireplace 4″ from the side wall.
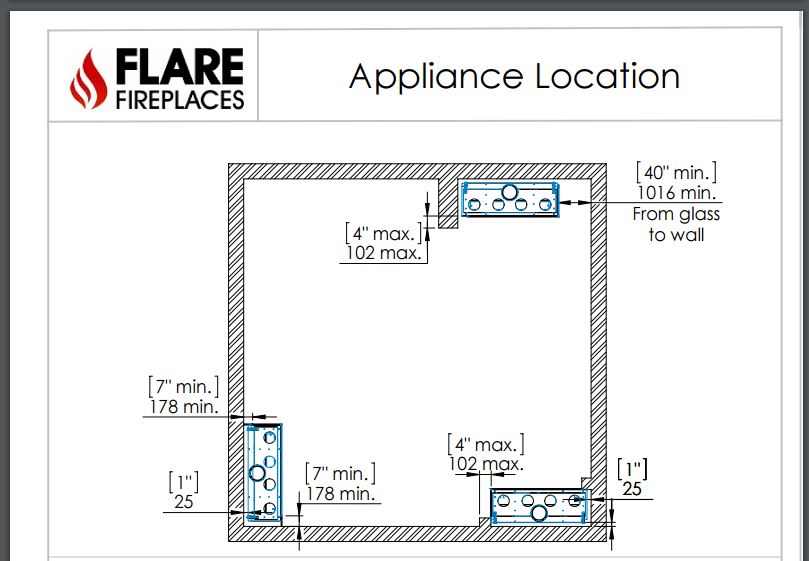
- See chart below:
Any stud above the unit must be metal in both options above.
Please see below for more related information from the framing guide
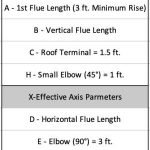
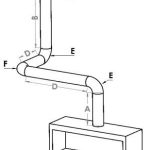
Flare-FF-50 vent calculation example based on the manual:
Vent path from Survey:
-
3 ft up from the fireplace
-
45 elbow
-
1ft
-
45 elbow up
-
15 ft vertical up
-
Vertical cap
Y vertical calculation
A – First Flue length = 3 = 3 ft
B – Vertical Flue length = 1 +15 = 16 ft
C – Roof Terminal = 1 = 1.5 ft
H – Small Elbow (45°) = 2 = 2 ft
Y Axis Parameters = 22.5 ft
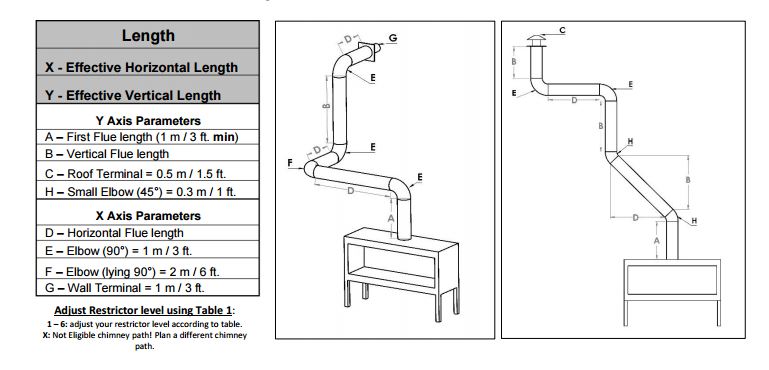
X Horizontal calculation
D – Horizontal Flue length = 1 ft
E – Elbow (90°) = 0
F – Elbow (lying 90°) = 0
G – Wall Terminal =0
X Axis Parameters = 1
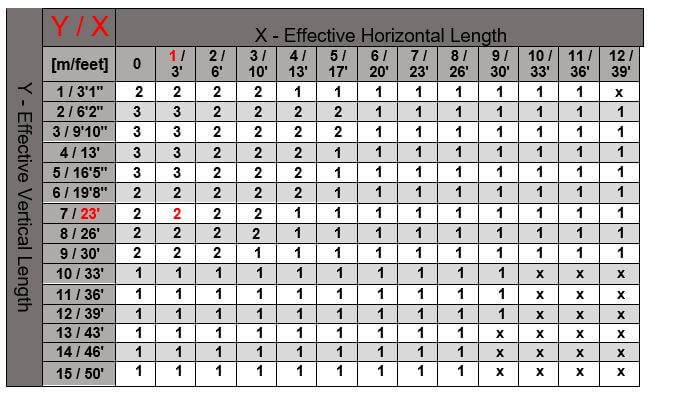
Yes. The flame up/down control on the remote adjusts the flame height, and lowering the flame also lowers the heat output. Pressing flame down steps the flame size down; taken all the way down, it shuts the flame off.
Important: this feature only works if the fireplace was started from the remote. If the fireplace was turned on with the wall switch or through a home automation system, the remote will not modulate the flame. The fireplace stays at full flame until it is turned off by the same method that started it.
For that reason Flare recommends operating the fireplace from the remote whenever you want access to flame height, heat adjustment and the remote’s other features.
Related: Can the remote be used after starting the fireplace with the wall switch? | Can I use Home Automation Integration with my Flare Fireplace?
For older Flare Fireplaces legacy direct vent models using the Maxitrol or Honeywell Valve Systems, an upgrade to SIT Proflame II is available for most fireplaces. Update instructions detailed below.
Maxitrol (GV60) to SIT Proflame II Update – Screen Safety Barrier
Maxitrol (GV60) to SIT Proflame II Update – Double Glass Barrier
Please speak with your local fireplace dealer about the potential of this upgrade, or reach out to sales specialist team ([email protected]) to see if it is possible to upgrade your fireplace valve system.
Follow the video link below to see the process of removing thermostatic mode from your Flare Fireplace.
Removing/Enabling Thermostatic Mode From SIT ProFlame II Remote
The Remote control can operate as a room thermostat. The thermostat can be set to a desired
temperature to control the room temperature. The thermostat icon on the LCD screen will display the
thermostat status is ON. The user can then set a suitable temperature for the space.
Information regarding thermostatic mode can be found in the Installation Manual (pgs 16-17)
Follow the video instructions below to enable the AUX Mode (auxillary) on your Flare Fireplace.
Using SIT Remote To Turn On Aux-Mode
Aux Mode is used for all Flare Fireplaces with Double Glass Active Fans and Power Vents and must be enabled for fireplace operation
To resync your LED remote, follow the videos below step-by-step.
Inspect the back (battery cover) to determine which generation your LED remote uses, and use the appropriate link below.
Gen 1 LED Sync – No Arrow On Remote Back
Gen 2 LED Sync – Arrow On Remote Back
If you are unable to resync your LED remote to the LED controller, you can reach out to your local dealer team or contact [email protected] for further assistance.
Yes, Flare Fireplaces are set up to integrate with your existing Home Automation device to pass the On/Off command of the fireplace.
SIT- Home Automation Integration
*It is important to note that the fireplace will only listen to one command at a time, either via the on/off wall switch (replaced by your Home Automation connection) or the provided remote. Whichever method you use to start the fireplace will be the same method needed to turn off the fireplace. Flare recommends the use of the remote for operation if the potential use of additional features is desired.
Flare provides movable “leaves” to help isolate up to 40% of the burners ports, pushing more LP into the open and available burner ports giving a slightly more elevated flame height. The guide below will help illustrate the leaves and how they can be arranged to assist in provided more flame height.
It is important to note that Liquid Propane burns hotter than Natural Gas, thus our valve and orifices must be dialed down to prevent overheating of the fireplace. Liquid Propane tends to provide 4″-6″ flames on average with your Flare Fireplace.
Liquid Propane Operation & Burner Adjustments
You can also adjust the air shutters to an even 50/50 mix to help provide an optimal appearance with minimal soot.
Instructions and details of features of the SIT Proflame II remote can be found in the link below.
SIT ProFlame II Remote Operation Manual
If your remote/receiver are not responsive, you can try resyncing the remote to the receiver to ensure communication is taking place.
Celsius to Fahrenheit On Flare Remote
Changing Celsius to Fahrenheit, & vice versa, on the Flare 8-Button remote can be done by pressing the ON and Counter down button. Because Flare also serves the Canadian Market it is important to offer both units seamlessly. For a clear outline of the process see the image below.
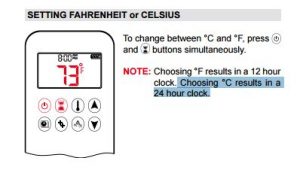
For more information on the Flare 8 button remote, please view the remote manual below:
For a quick video on the remote operation use:
- Click here to view a video on Symax 4 remote control
The change in the setting may happen during an attempt to start the fireplace by pressing both buttons.
Removing the Glass on Double Glass Fireplaces
Keeping a clear view takes a careful touch.
How do I remove the glass on a double glass fireplace?
On Flare Double Glass models, the outer safety glass is designed to be removable for cleaning or service. To remove it:
– Make sure the fireplace is completely off and cool.
– Secure two industrial glass suction cups against the outer layer of tempered glass.
– With suctions cups secure, lift the outer glass panel slightly upward, then pull it outward and away from the unit.
– Place the outer tempered glass on top of a padded moving blanket and in a safe location away from the work area.
– Remove the filler pieces on the left, right, and then bottom of the fireplace, exposing the inner glass trim pieces.
– Loosen hand screws and remove the left, right, and bottom inner glass trim, and place them in a safe location.
– Loosen the hand screws to open the upper butterfly trim.
– Secure two industrial glass suction cups against the inner layer of ceramic glass.
– With suctions cups secure, lift the inner glass panel slightly upward, then pull it outward and away from the unit.
– Place the inner ceramic glass on top of a padded moving blanket and in a safe location away from the work area.
The glass should only ever be removed for cleaning, and by a certified service technician. When reinstalling, ensure the glass is seated properly in the frame and the inner glass trims are properly positioned over the inner layer of glass, securing it against the gasket running the perimeter of the fireplace opening.
Remote and Wall Switch Use
One fire, two ways to control it.
Can the remote be used after starting the fireplace with the wall switch?
GV60 Valve System: Yes. The remote and wall switch can be used together to turn the fireplace on or off, no matter which one you used to start it.
SIT ProFlame II System: No. The remote and wall switch operate independently. If you turn the fireplace on with the remote, you’ll need to turn it off with the remote. The same applies if you use the wall switch.
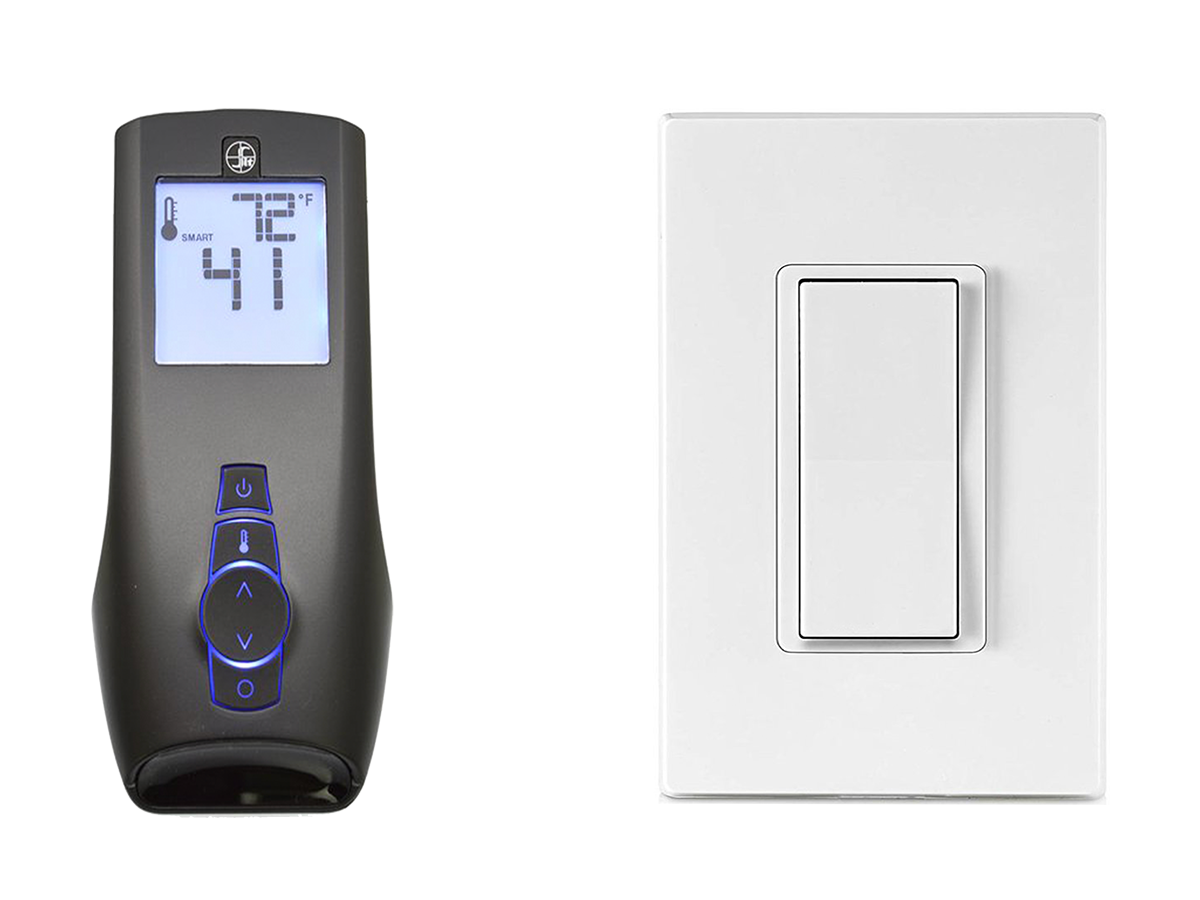
Honeywell Valve System: This does not ship with a remote or wall switch, but with a power cable that must be wired to switched power, or even 3rd party smart devices. 3rd Party Outlet/Remote Options
These steps are for Flare fireplaces with an SIT control system.
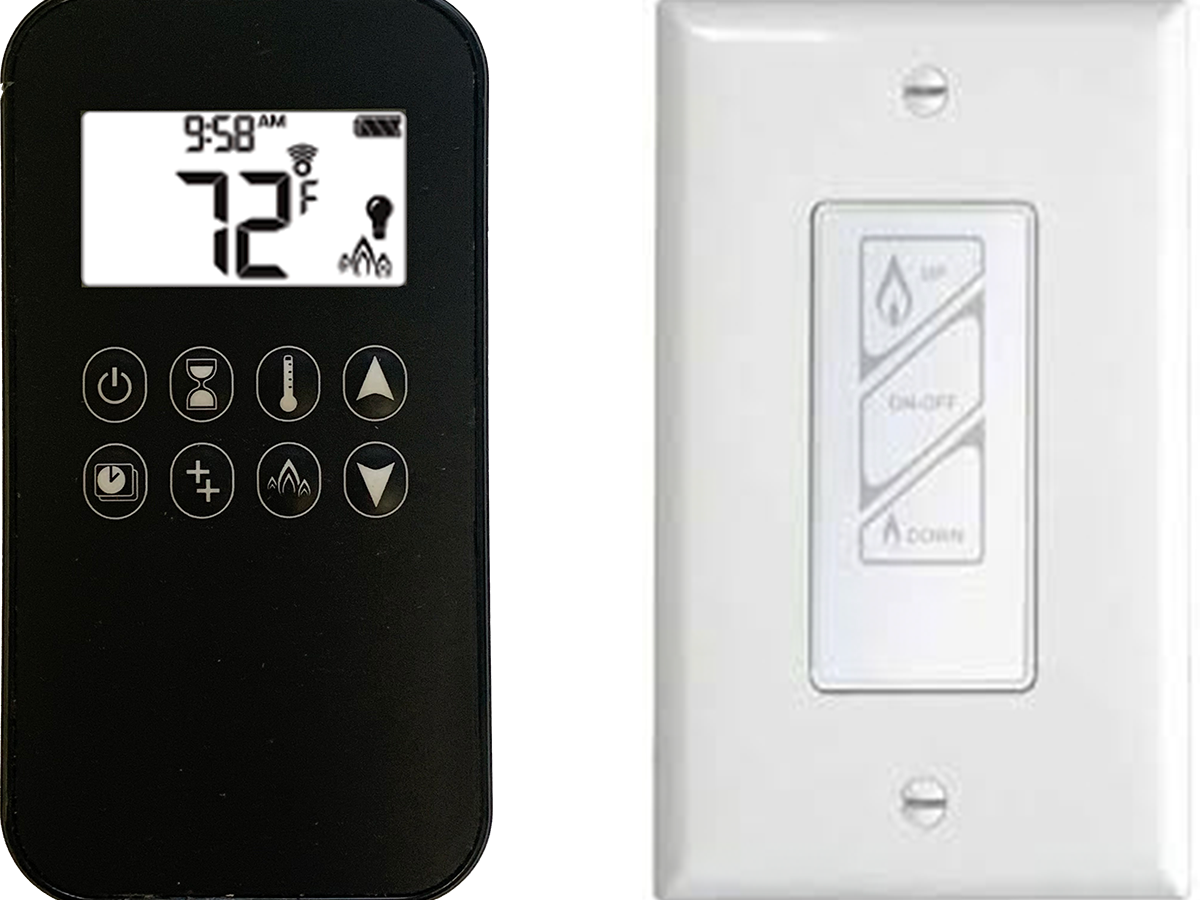
- Turn on the fireplace with the fireplace remote (the black remote).
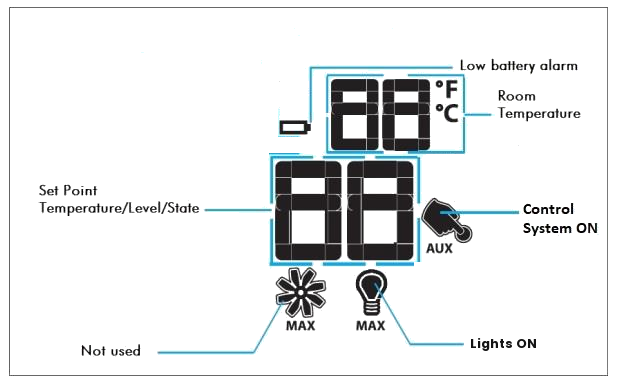
- Check that the light function is ON on the black remote. The light bulb icon should show on the screen. If it doesn’t, press the lower button to move through the functions until the light bulb appears, then set it to ON.
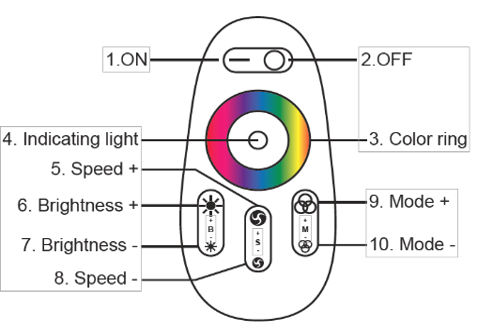
- Turn on the lights with the LED remote (the white remote) by pressing ON, the (–) side of the top switch (#1 on the diagram). The orange indicating light (#4) should come on when you press it.
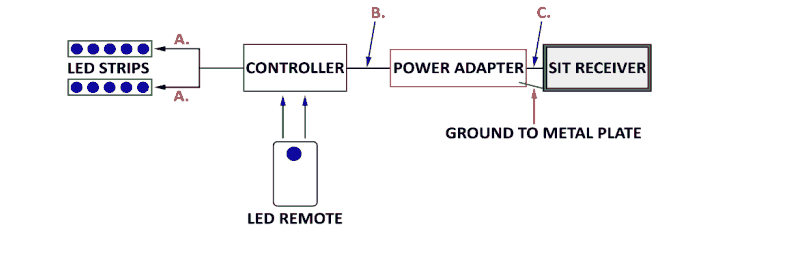
- Check the LED wiring before you call your installer. Use the diagram below and make sure each connection is secure:
- A. Both LED strips are plugged into the controller.
- B. The controller is connected to the power adapter. The red wire should be on the + terminal of the controller.
- C. The power adapter is plugged into X11 on the SIT receiver.
- Ground: the power adapter’s ground wire is attached to the metal plate.
- Watch the video: LED troubleshooting video
Note: If your LEDs were ordered with independent power (their own plug), they work without the fireplace on. Skip steps 1–2 and make sure the plug is connected to a working outlet.
More information: see RGB LED Installation on page 67 of the Flare SIT Install Manual.
If the remote still doesn’t control the lights, see “How do I resync my LED remote?” in this FAQ. If the lights still don’t work after these checks, contact your installer or Flare dealer.
Yes, it can. The Inline Summer Kit is designed to work with both horizontal and vertical termination caps. For vertical termination, use an elevated J-type termination, the same type used for a gas dryer’s vertical termination.
The Flare Fireplaces Summer Kit fan is a 212 CFM system.
Please consult your local dealer team to determine exactly which components need replacement. The technician will need the fireplace’s serial number and pictures of the potentially damaged components. Alternative components will be needed if your fireplace does not use the SIT Proflame II valve system.
Send any additional questions or details to [email protected] to connect with an assisting representative.
Flare Fireplaces provides Free Flow sizing guidelines to ensure proper airflow and safe
operation. The required louver size depends on the fireplace model and whether it is used for Heat
Release or Air Intake.
Heat Release Louvers (Free Flow):
These are required to allow heat to escape from the enclosure. Typical sizing includes:
100 sq in → Flare 25, 30, 45, 50
140 sq in → Flare 60, 70 (Traditional/Passage)
200 sq in → Flare 80, 100
Air Intake Louvers (Free Flow – Double Glass Units Only):
These provide airflow into the enclosure and are only required for double glass units.
50 sq in → Flare 25, 30, 45, 50
70 sq in → Flare 60, 70 (Traditional/Passage)
100 sq in → Flare 80
Important Notes:
An Air Intake is not required for screen units.
Heat Release and Air Intake louvers must remain unobstructed at all times.
Always follow the specific model installation manual to confirm exact requirements.
See Through and Room Definer Air Intake opening requirements are doubled.
Yes. Flare Fireplaces offers both heat release and air intake solutions, depending on the fireplace
configuration.
Heat release systems are designed to redirect and dissipate heat away from the fireplace opening.
This helps reduce wall temperatures and allows for more flexible installations, such as placing TVs
or sensitive materials as close as 12” from every fireplace glass opening.
Air intake systems are specifically used with double glass units. They provide the necessary
airflow to regulate internal temperatures between the glass panels and ensure proper performance.
For screen (single glass/open front) units, an air intake system is not required, as these models
naturally allow airflow through the front of the fireplace.
Both solutions are engineered to enhance safety, optimize performance, and support a wider range
of installation designs. Always refer to the specific model’s installation manual for exact
requirements.
Heat Release and Air Intake louvers play a critical role in maintaining safe operating temperatures
on the glass and surrounding wall by
Each 8″ fan used in in the Double Glass Active system and Blower Kit fan system has an airflow capacity of 76 CFM.
To discuss further details about the fans in your fireplace, send your Serial Number over to [email protected] with any questions.
The spare fuses are located on the lid of the control board. Be sure to note which fuse you need and grab the appropriate fuse. There are 2 replacement fuses provided on each control board.
- 1 AMP
- 12 AMP
SIT V5 Control Board Replacement Fuse Location
To control the air shutters on your Flare Fireplace burner, use a small hex key (or phillips screwdriver on legacy fireplaces) to adjust air/gas ratio for optimal burn with minimal soot appearance.
Fireplaces 50″ or Smaller: 1 Adjustment
Fireplaces 60″ or Larger: 3 Adjustments
Adjusting Flare Fireplaces Air Shutter
If the flame is yellow/orange with no blue base (low air leading to a rich flame – will produce soot) – Introduce more air by turning the air shutter clockwise
If the flame is blue with No blue base and produces soot (low air leading to a clean flame – will produce smaller flames) – Reduce the air by turning the air shutter counterclockwise
Yes, Flare offers specification manuals guiding you on the size, parameters and placement of your heat release and air intakes. See specification manual below regarding your unit’s requirements.
Heat Release Specification Manual
- Required on every Direct Vent Flare Fireplace installation (unless using the Active Heat Flex for relocating heat)
Air Intake Specification Manual
- Required on every Direct Vent Flare Fireplace that utilizes the Double Glass or Blower Kit Fan System.
There are a few common producers of soot within a fireplace, below are the most common that can be inspected by a technician.
Soot is a product of incomplete combustion of gas within your fireplace. With all gas fireplaces soot will be generated in small amounts but some instances excessive quantities may be generated during operation. Sooting is generally an easy to resolve problem and there are several potential solutions as listed below.
Inlet Pressure
Always ensure that the inlet gas pressure matches the requirements in the unit’s specification file. This issue generally arises when the inlet gas pressure is too high, allowing too much gas to enter, resulting in incomplete combustion. It is this resulting material that collects and deposits in your firebox and stains over time.
Air Shutter
The air shutter is responsible for balancing the mixture of air and gas during combustion. Please note: on units 60” or larger, there are 3 air shutters that must be adjusted to ensure the cleanest burn possible. The air shutters can be adjusted when the fireplace is originally placed in it’s cavity under the unit. Adjustment screws are shown circled in red. If adjustment needs to be made after fireplace has had finishing material, this can be done within the fireplace using a Phillips head screwdriver.
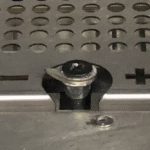
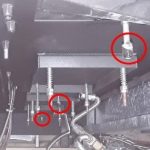
Media Arrangement
Please pay close and careful attention to the media arrangement over the burner port. While Flare supports covering the full base of the firebox with crushed glass, small fragments of media can clog the small ports that gas is channeled through, causing incomplete combustion. With driftwood, logs and branches, placing branches to arch over the burner ports can also cause byproduct which is normally pulled out of the fireplace through the coaxial pipe to become trapped under the branch/driftwood. Ensure bends are pointed down if placement across port is required to ensure the most chemical waste can be removed from the firebox post combustion.
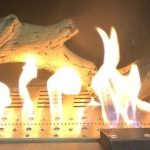
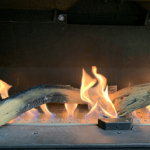
Vent Restrictor
Your vent restrictor is utilized to restrict the speed at which fresh air is brought into the fireplace and products of combustion are removed. If there is an imbalance in this closed combustion environment, soot is one possible result. Vent restrictors can be adjusted on all Flare Fireplaces. See Details in the Installation Manual (pg 60)
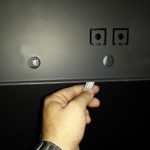
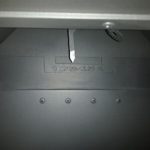
Vent Run Verification
If the fireplace is installed and an unsupported vent run is utilized, sooting is one of many problems that may occur. If your fireplace does not allow for the products of combustion to exit the firebox as effectively as fresh air is brought in, pockets of soot will collect in the unit storing the dark and harmful debris. Please verify that you have consulted the chimney paths section of the Flare Installation Manual for supported vent runs. If you have questions about a particular path, please reach out to Flare support for clarification and approval.
F-04 is an error code that will flash on your Symax GV60 Maxitrol Flare remote when the valve fails to receive the message that the thermocouple has been warmed by the pilot light. This failure can have multiple different causes.
Gas Flow
Confirm that gas is flowing to the unit. This can be done by confirming that the main manual gas valve is open, or removing the glass and confirming that gas is flowing through the pilot. If gas is not flowing to the pilot it can be an indication that the gas is either not on, or that there is a problem at the valve such as a disconnected pilot tube, or a clogged pilot tube or valve. If gas is flowing to the valve but not releasing to the pilot, try re-syncing the remote and receiver. (see the flare install manual for the procedure.)
Ignition Spark
The second thing to confirm is the presence of sparking of the ignition at the pilot flame. There have been instances where the spark cable has been disconnected from the spark plug or receiver, or a break has formed in the cable exposing the wire. Even though you hear the unit sparking, it may just be sparking underneath the fireplace and not at the pilot. This can be done by looking through the holes in the pilot cover or by taking a look under the pilot hood for the indicating flash of spark.
Clear Pilot Openings
The third thing to confirm is that no media has become lodged under the pilot hood causing a blockage at the pilot opening which will not allow gas to be released and come in contact with the spark.
Check the Thermocouple
The last thing to check is to make sure the thermocouple isn’t broken, kinked or that lead ball inside the valve at the end of the thermocouple has not been over tightened and crushed.
For all above steps contact your authorized fireplace installer for assistance.
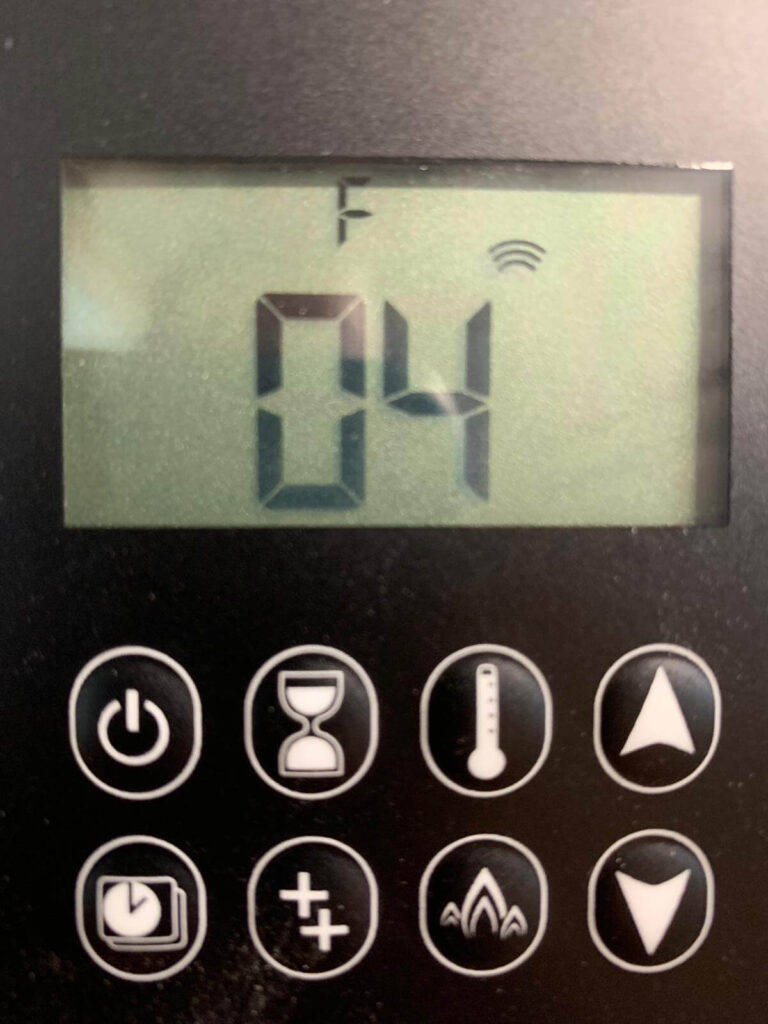
GV60 | F04 ERROR
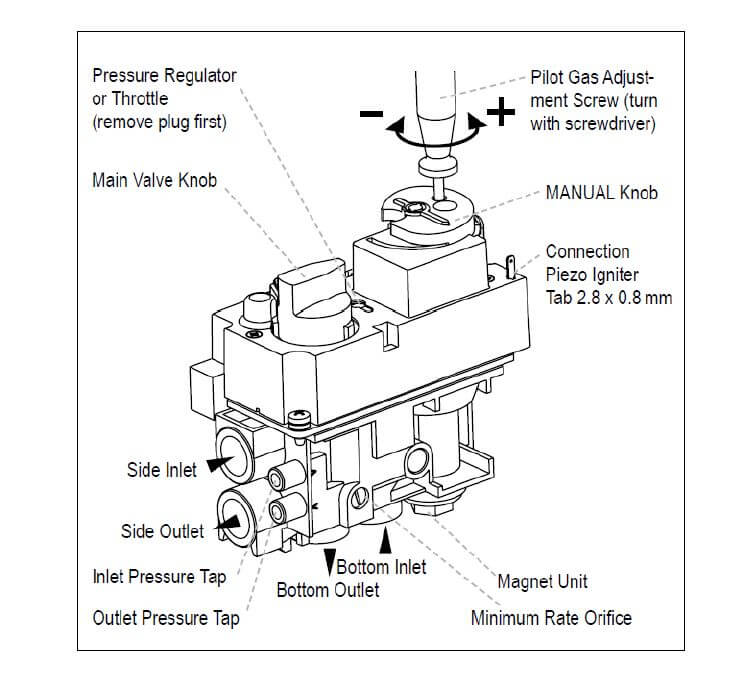
See below for Flare modern fireplace GV60 gas value, inlet and outlet test ports. All of Flare frameless fireplace share the same gas valve system .
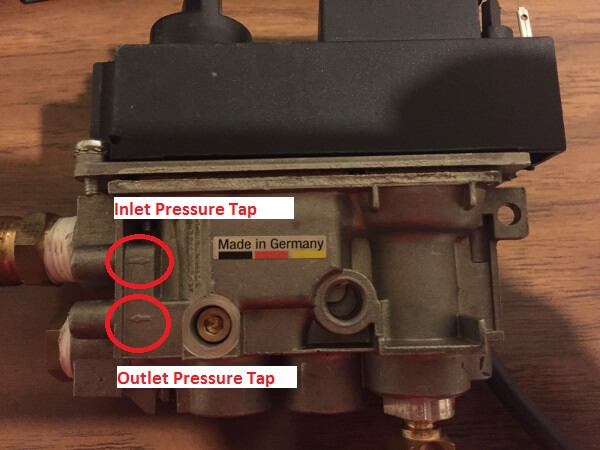
Overall port diagram
For best results, Flare recommends ordering your fireplace with the correct gas type. Understanding circumstances can change at each jobsite, instructions for swapping the components on your Flare Fireplace are included below. Conversion swaps available for both NG to LP and LP to NG.
- It is always imperative to leak test all gas connections after a motor/valve swap
- Always inspect your Inlet/Manifold pressure to confirm motor is operational
When converting a Flare Fireplace to a new gas type, it is critical/required to change the following:
- Motor at Valve
- Pilot Orifice
- Burner Orifice(s)
NG to LPG – SIT – Conversion
NG to LPG – SIT – Motor Conversion
Verify Inlet Pressure – NG
Verify Inlet Pressure – LP
If your Direct Vent Flare Fireplace is a legacy unit using the Maxitrol or Honeywell Valve System, please contact [email protected] for further conversion details.
For Fireplaces sized 30″ up to 70″ – a Minimum of 3′ rise off the top of the fireplace is required before any elbow
For Fireplaces sized 80″ up to 100″ – a Minimum of 6′ rise off the top of the fireplace is required before any elbow
Installation Manual (pgs 60-69) for specific venting details
These minimums are required to ensure a natural draft is able to successfully remove the products of combustion.
The only exception to this for Front Facing/See Through fireplaces is to use the 45 degree elbow details within page 86 of the Installation Manual to work around any recess directly above the fireplace.
Details for custom chimney shrouds will be linked below.
Custom Chimney Shroud | Specification Manual
If there are questions or details you need to discuss with a representative, please send any relevant information to [email protected] to get started.
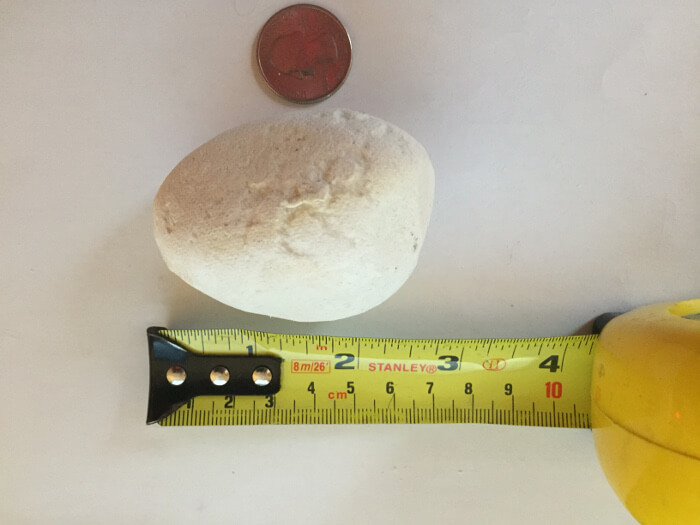
The pebbles size will vary and are approximately 2 – 3 inches.
See below picture for a better perspective of the pebbles.
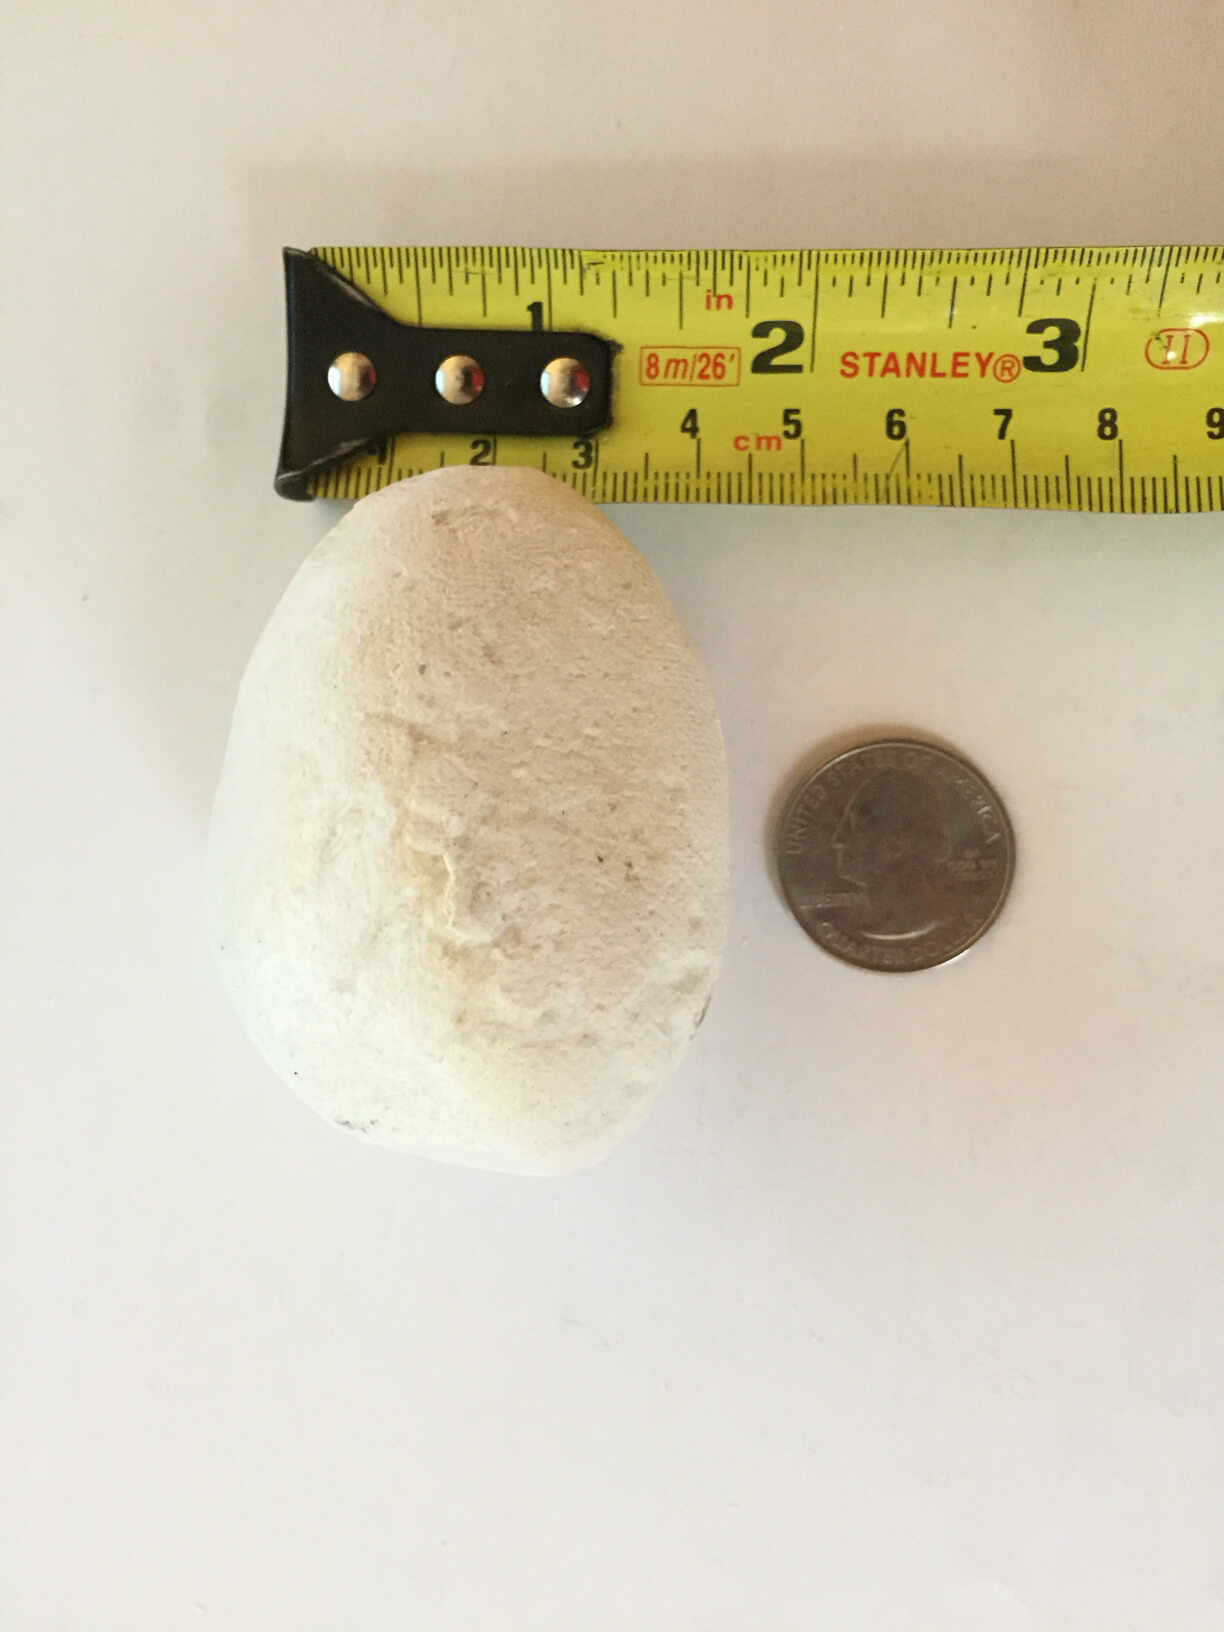
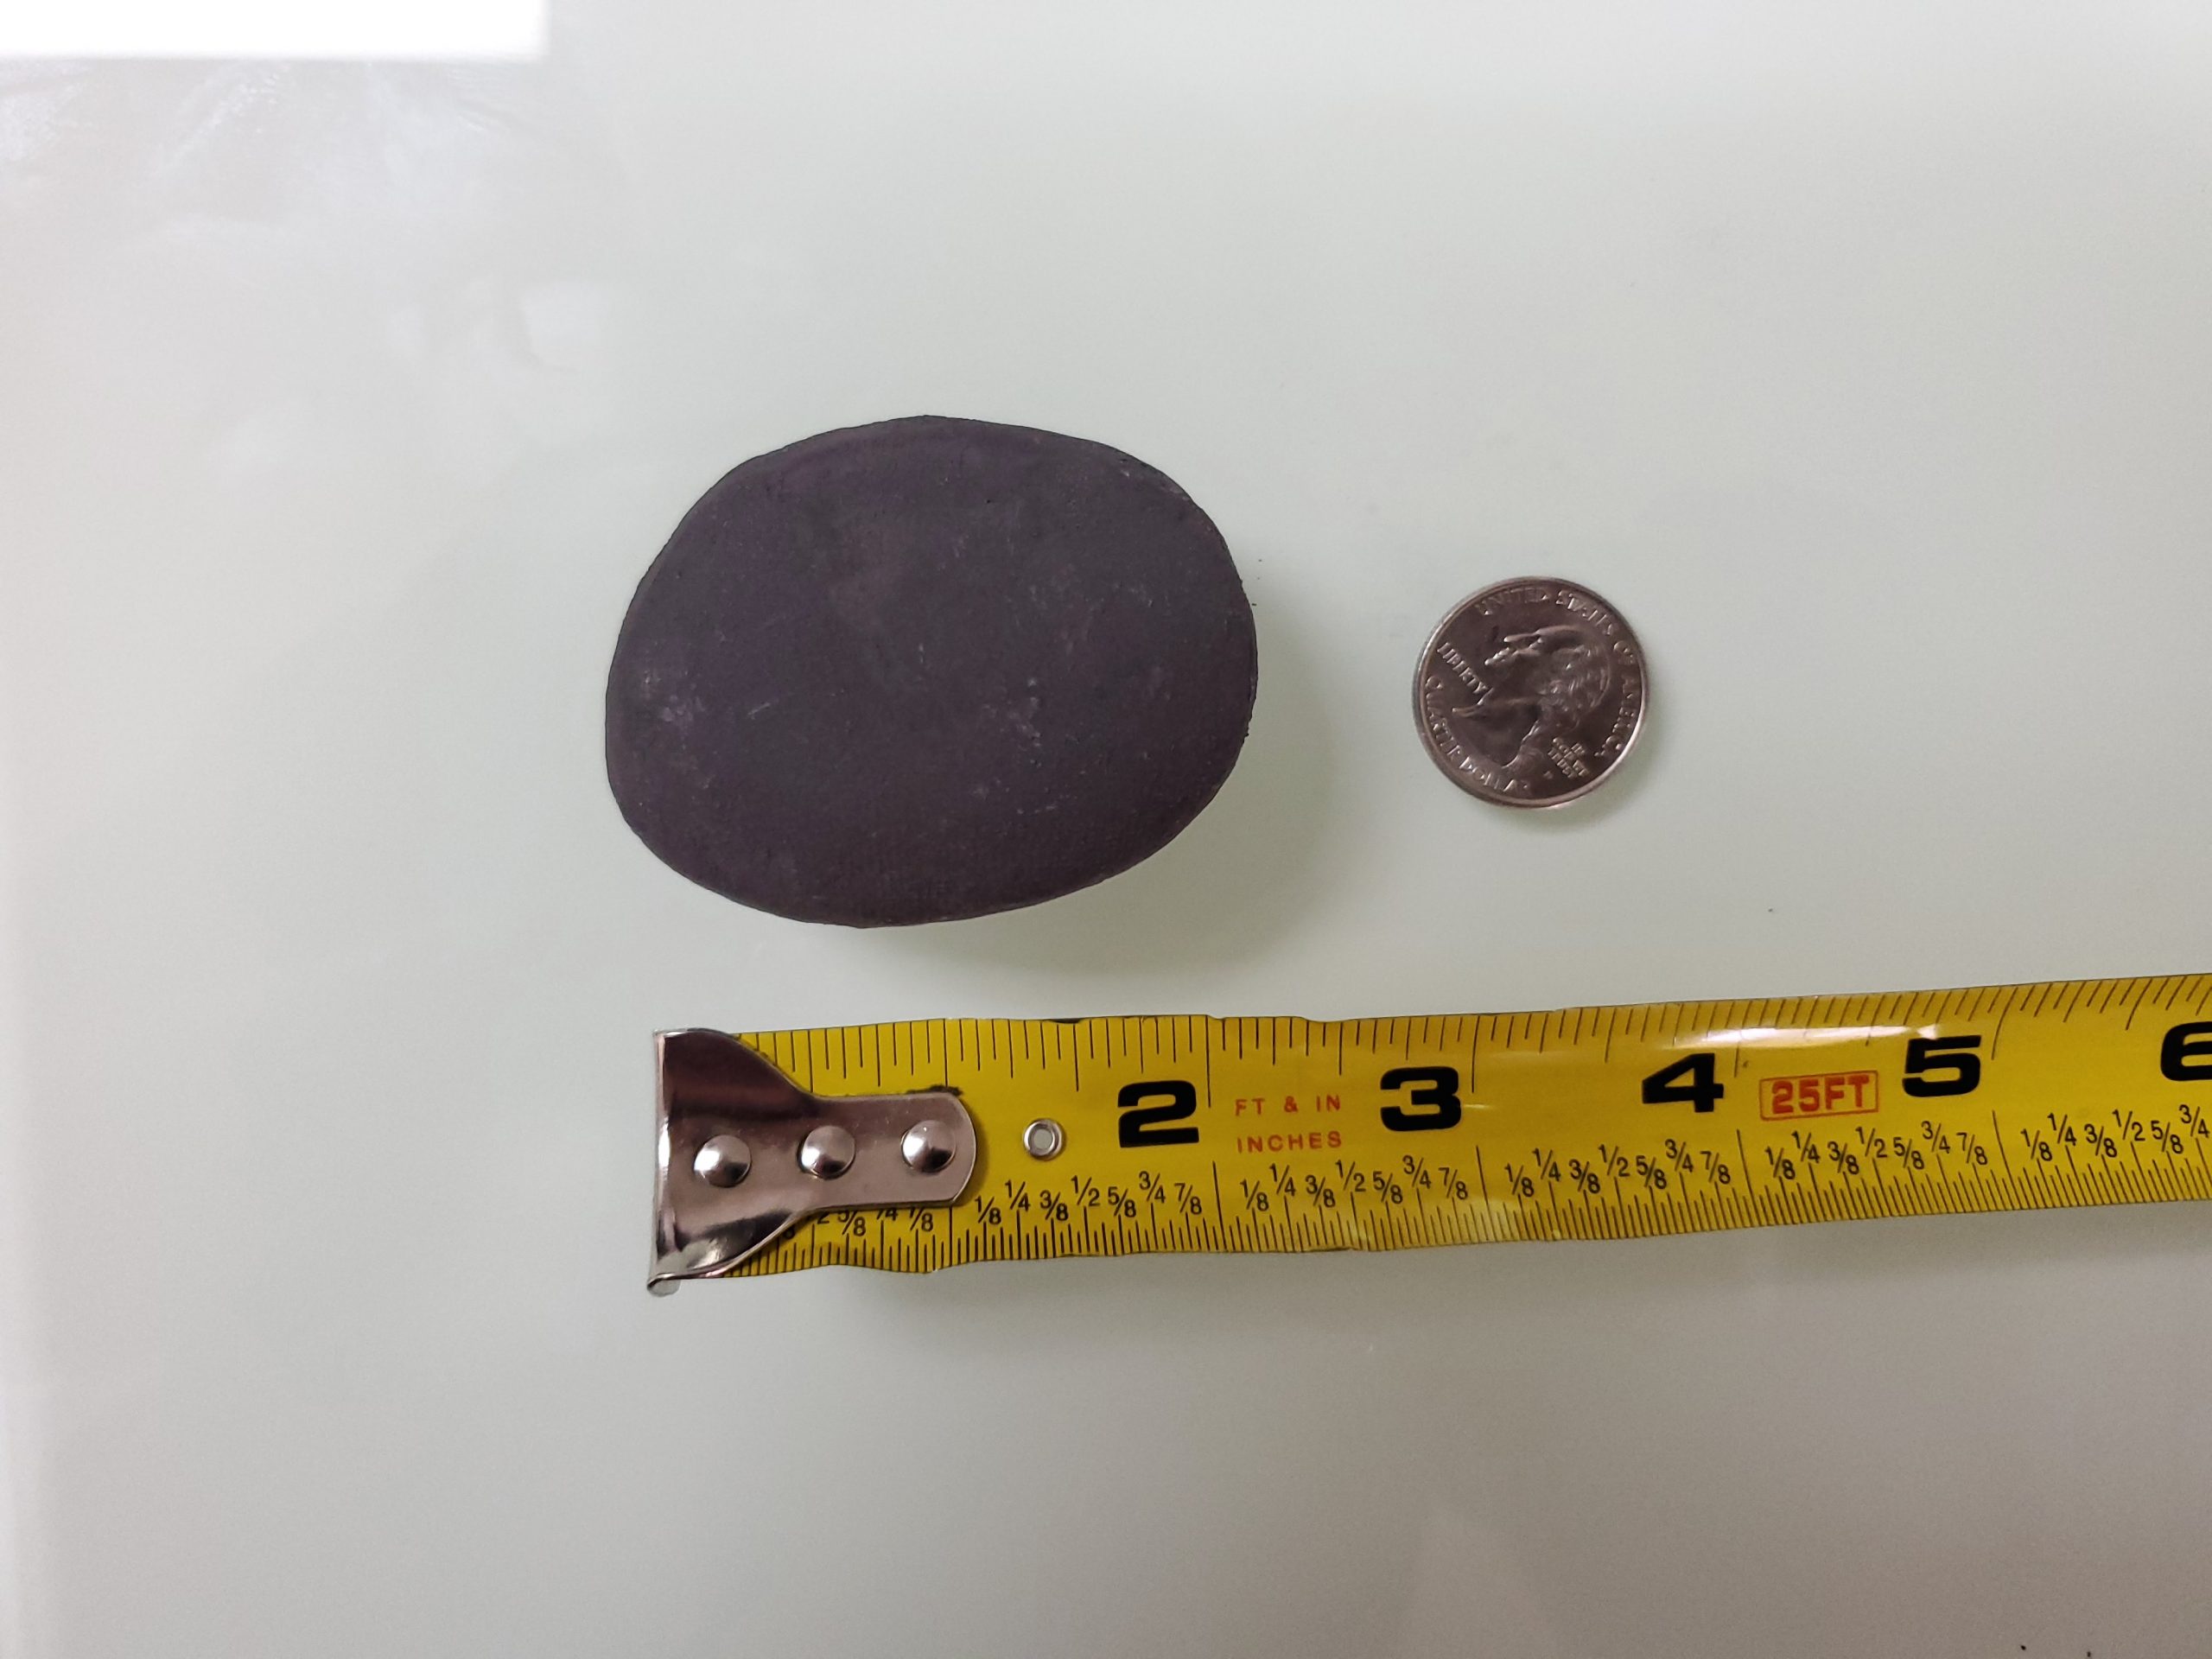
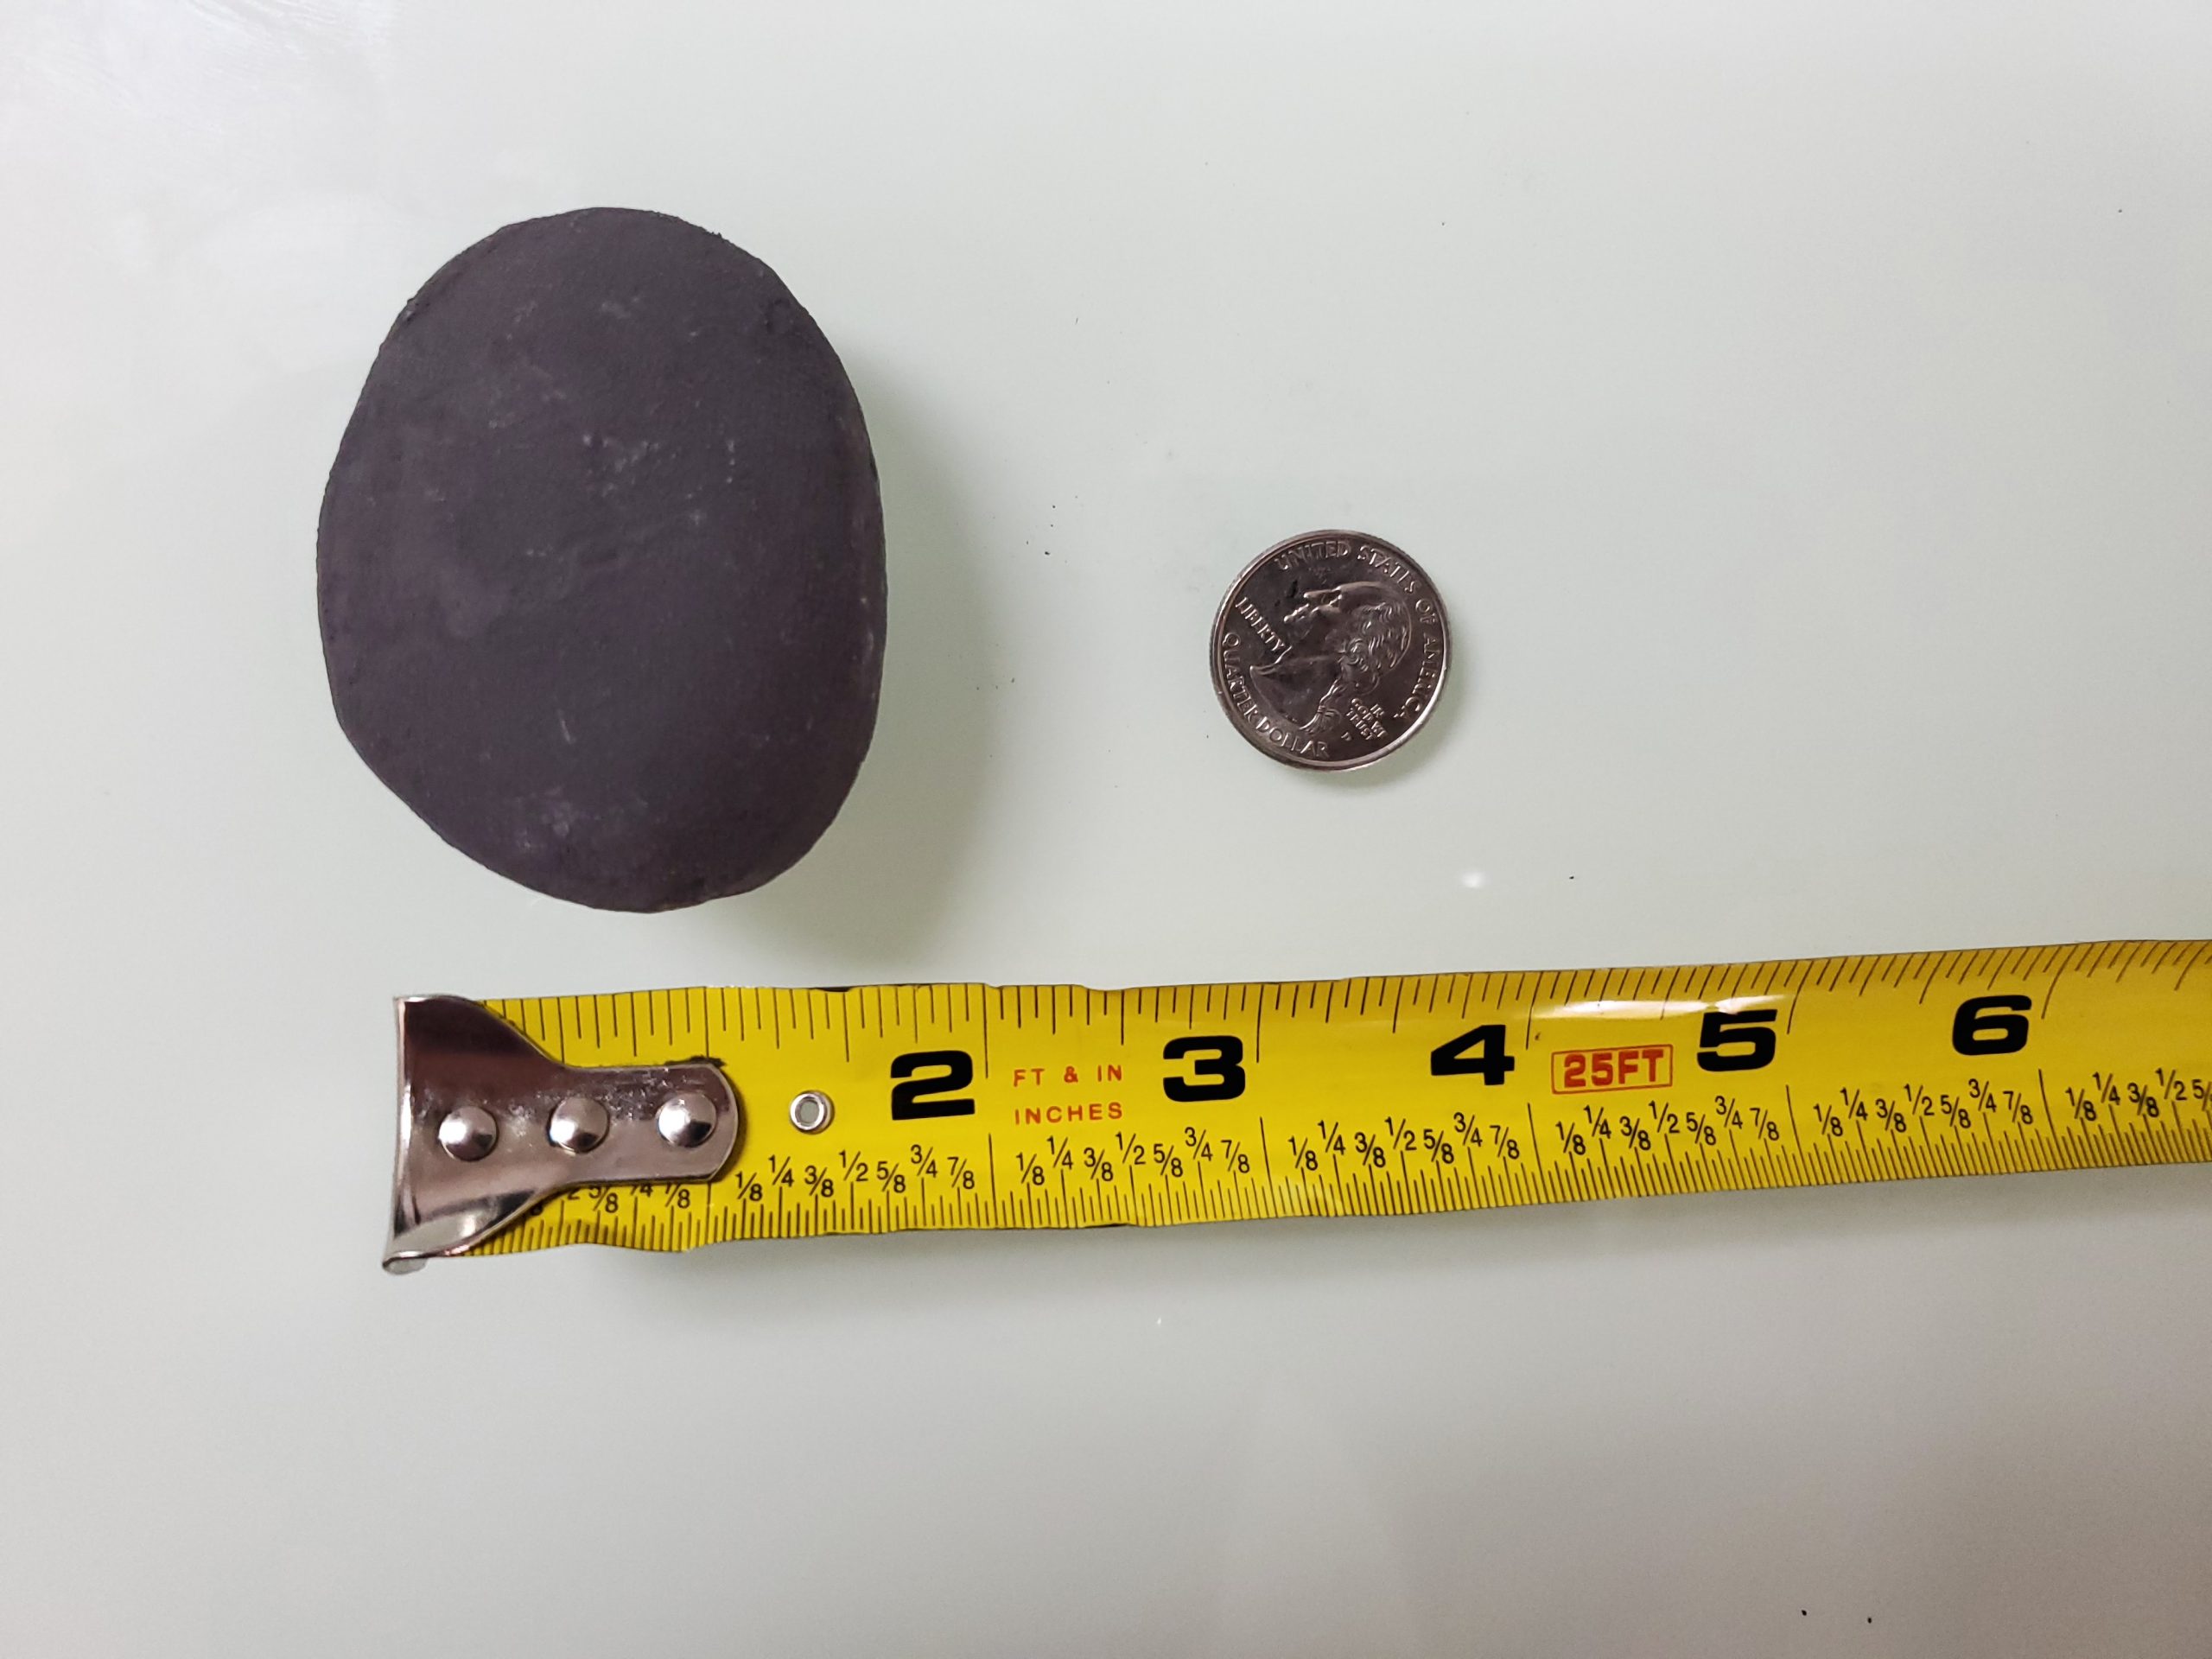
The stones size will vary and are approximately 1 1/2″ – 3″.
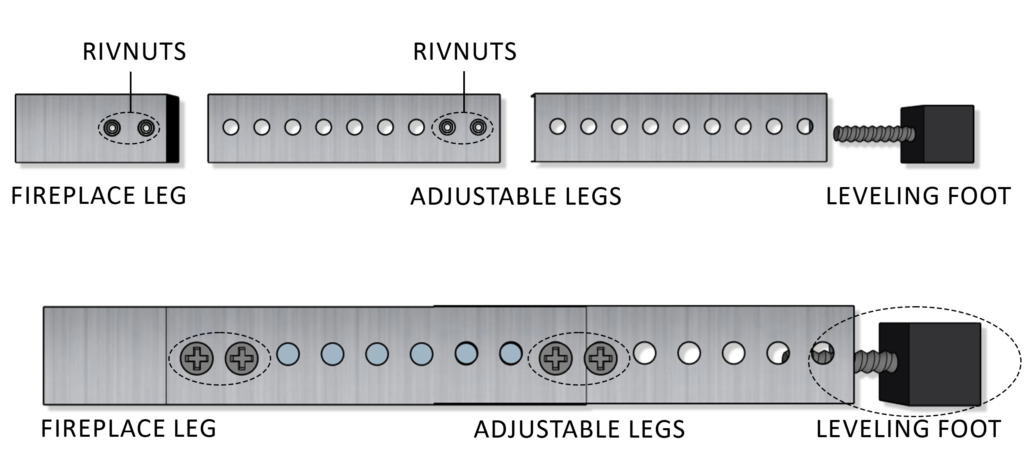
Telescopic Leg Assembly, Corner Style Fireplaces
Some parts ship smart, not missing.
Why are the corner fireplace’s legs shipped separately?
On corner fireplace models (Flare-DC, Flare-RC, and Flare-LC), the fireplace’s telescopic legs are shipped separately and assembled during installation. This is because the corner glass design prevents the legs from being fully inserted during shipping. On front-facing fireplaces (Flare-Front) and see-through fireplaces (Flare-See Through), the telescopic legs are pre-assembled at the factory and do not require installation on-site.
Answers to the most common Flare fireplace questions
This Flare fireplace FAQ gathers the questions Flare's team answers most often, spanning installation and framing, gas and venting, the SIT ProFlame II and Maxitrol controls, heat release and air intake, media, and troubleshooting.
Search the full list or filter by topic to jump straight to an answer. Every response in this Flare fireplace FAQ is drawn directly from Flare's official installation and technical documentation, so the guidance stays manufacturer-accurate.